UserVoice SDK is now packaged in a rubygem (library & the source). This document illustrates its usage with installation instructions and a few examples just to get you quickly started. If you like reading code more, check out our example project: uservoice-ruby-example-app.
Install the SDK from RubyGems
Add this into your Gemfile:
1
gem'uservoice-ruby'
and run the bundle command. If you’re not using bundler, you can install it like this:
1
geminstalluservoice-ruby
Ready to go! Let’s see what we can do with this.
Creating a new API client
For creating a new API client you need to do a few things. First, get your API KEY and API SECRET from UserVoice Admin Console and pass them as parameters to the client like this:
Now we have an API client that we can use to connect Helpdesk API.
Post a new ticket
Making requests using the client follow the format client.method(path, hash-params). In the first example we post a new ticket, which is possible if you have the helpdesk service.
12345678
# Post a new ticket to your helpdesk from sidson@example.com@sdk_question=client.post("/api/v1/tickets.json",{:email=>'sidson@example.com',:ticket=>{:subject=>'Ruby SDK',:message=>"I'm wondering if you would have any OAuth example for Ruby?\n\nThanks,\n\nSidson"}})['ticket']
Post a suggestion using an access token
Acting on behalf of the user lets you leave out the email parameter as well as access to user-requiring API calls. In the following example we post a new suggestion in your first forum. You need feedback service for this example.
1234567891011121314151617
# Login as man.with.only.answers@example.com and retrieve an access tokenclient.login_as('man.with.only.answers@example.com')do|access_token|# Get the first forum id for the example which access_token has access toforum_id=access_token.get_collection('/api/v1/forums?sort=newest',:limit=>1).first['id']# Make the request using the access tokensuggestion=access_token.post("/api/v1/forums/#{forum_id}/suggestions.json",{:suggestion=>{:title=>'Color the left navbar to green'}})['suggestion']user=access_token.get("/api/v1/users/current.json")['user']puts"#{user['name']} created suggestion: #{suggestion['url']}"# Prints: Anonymous created suggestion: http://.....end
Get the access token of the account owner and post responses
To respond to the ticket, you need to log in as an admin (or owner).
123456789101112
# This logs in as the first owner of the accountclient.login_as_ownerdo|owner|posted_response=owner.post("/api/v1/tickets/#{@sdk_question['id']}/ticket_messages.json",{:ticket_message=>{:text=>"Hi #{@sdk_question['contact']['name'].capitalize}!\n\n"+"We sure do! See the installation instructions and a few example API calls "+"here: http://developer.uservoice.com/docs/api/ruby-sdk\n\n"+"Best regards,\n\nRaimo Tuisku\nDeveloper"}})end
Getting a list of suggestions
You maybe noticed the use of get_collection when getting the first forum ID. Whenever you need to fetch paginated results (like all suggestions), you can use our lazy-loading collection.
12345678910
# Creates a lazy-loading collection object but makes no requests to the API yet.suggestions=client.get_collection("/api/v1/suggestions?sort=newest")# Loads the first page (500) of suggestions and reads the count.puts"Total suggestions: #{suggestions.size}"# Loops through all the suggestions and loads new pages as necessary.suggestions.eachdo|suggestion|puts"#{suggestion['title']}: #{suggestion['url']}"end
Log your users into your Widget using SSO
If your site has both authenticated users and the UserVoice Widget installed,
you should definitely pass the email of your logged-in user to the UserVoice
Widget so that users don’t have to type it again in your site.
Generating an SSO token should be done on the server side, as you should never
reveal your API SECRET to anyone. Here’s how you do it:
12345
defcurrent_sso_token@current_sso_token||=UserVoice.generate_sso_token(SUBDOMAIN_NAME,SSO_KEY,{:email=>current_user.email},300)# Default expiry time is 5 minutes = 300 secondsend
Now you can pass the SSO token to the UserVoice Widget JavaScript snippet. Make
sure the aforementioned method current_sso_token can be called from there.
12345678910
<script type="text/javascript">varuvOptions={params:{sso:'<%= current_sso_token %>'}// This syntax is ERB, but you can use whatever templating language you like.};(function(){varuv=document.createElement('script');uv.type='text/javascript';uv.async=true;uv.src=('https:'==document.location.protocol?'https://':'http://')+'widget.uservoice.com/5rc7ps3vgS36bIPlmiDaqw.js';vars=document.getElementsByTagName('script')[0];s.parentNode.insertBefore(uv,s);})();</script>
That’s all! Now your users should be able to leave feedback and post tickets right away.
Associating your users with their UserVoice profiles
Connecting your users with their UserVoice profiles is possible by following a
procedure called 3-Legged OAuth. The steps required to do this are explained
below.
1. Provide a link or redirect user to /authorize from system X.
When you want to connect your current user to his or her UserVoice profile,
redirect the browser to the authorization url like this:
12
# Redirects user to the UserVoice authorization dialog.redirect_toclient.authorize_url
Providing a direct link is another way to do the trick:
1
link_to'Connect UserVoice',client.authorize_url
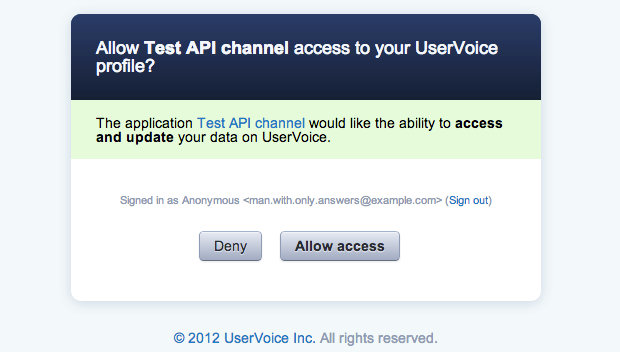
2. User is asked to log in and give X permission to access information in UserVoice.
The authorization dialog will look like this:
3. UserVoice redirects user back to system X and passes an oauth verifier
UserVoice will pass a verification code back to your system, which you can use
to request an access token for the user, so you know which profile in
UserVoice is owned by your currently logged-in user.
1234567891011121314151617
# Getting oauth verifier as a GET parameterifparams[:oauth_verifier]begin# Get access token for the useraccess_token=client.login_with_verifier(params[:oauth_verifier])# Persist the access token in the database for later usecurrent_user.update_attributes(:uservoice_token=>access_token.token,:uservoice_secret=>access_token.secret)rescueUserVoice::Unauthorized# false/old verifier, present errorflash[:error]="Access denied"endredirect_to'/'end
4. System X makes API calls to UserVoice using the access token.
Now whenever you need to, you can make calls on behalf of the user whom
you verified. Just use the access token you got in exchange for the verifier.
1234567891011
begin# Use the previously saved access token. Makes zero requests!access_token=client.login_with_access_token(current_user.uservoice_token,current_user.uservoice_secret)# Get current useruser_attributes=access_token.get("/api/v1/users/current.json")putsuser_attributes['email']# Prints: man.with.only.answers@example.comrescueUserVoice::Unauthorized# Tried to do something unauthorizedend